


Google Postmaster Tools is Gmail’s record keeper. It analyzes and provides reports about your IP and how it’s been doing. With it, you can gain insights into Gmail deliverability issues and so much more. Here’s how to use it.

There’s a mysterious chasm between your marketing platform and mailbox providers. When you send your emails out, it may feel like you’re launching them into the unknown.
Some email marketing platforms can tell you how many recipients opened, clicked, complained, and unsubscribed. That helps. However, apart from these metrics (and bounces), the journey of your email and the troubles it encounters on its way are unknown.
What you need is a guide. A trusted wizard-like advisor to guide you through the perilous lands of email. Your guide needs to be someone who:
- Can warn you of the dangers ahead.
- He needs to tell you where you’re going wrong.
- And most of all, what you need to fix.
This wise guide could help you to unravel the mysteries of the ISPs. He’d tell you where your email is likely to land (spam, inbox) and how to avoid the monstrous spiderwebs of spam traps, hard bounces, and other pitfalls.
For email marketers sending to Gmail, your ‘wizard’ with a capital G is Google Postmaster Tools!
Google Postmaster gives you valuable insights into your email’s journey to destinations, both known and unknown while providing you with reasons why it may fail in its quest to reach the inbox.
It’s easy to set up, and its help is invaluable.
To give Gmail recipients the very best experience, email marketers must adopt Google Postmaster Tools.
Here, we’ll go through everything you need to know about your guide through this endeavor and take you through the process of setting it up.
How to set up Google Postmaster Tools
Unlike some mysterious/hard to find wizards, Google Postmaster Tools is more willing. It’s straightforward to enlist the help of Google Postmaster. Here’s how you can set it up:
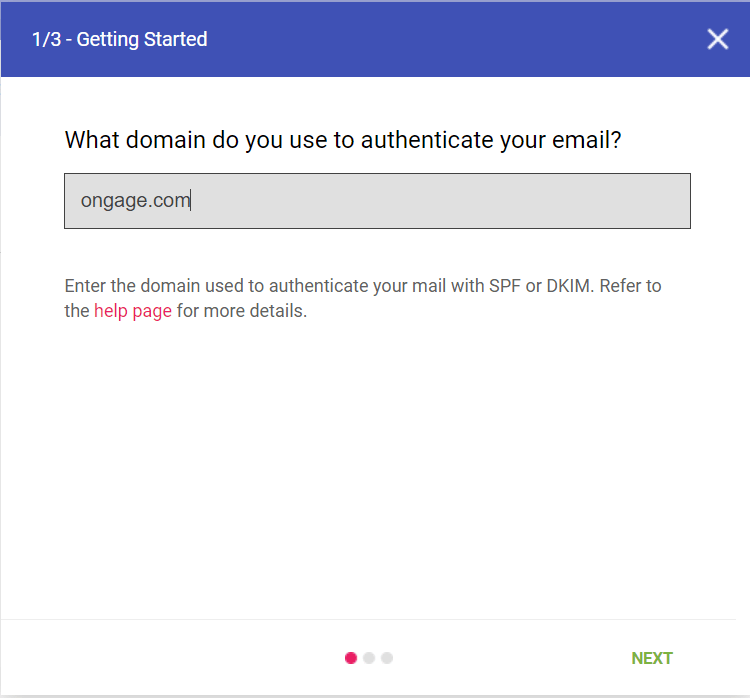
- Head to postmaster.google.com, and log in with your Gmail address.
- After clicking ‘Get started,’ it will ask you to enter your domain:
- Click ‘Next.’ Google will ask you to verify that you own the domain. At the same time, it will generate a string of TXT. Copy this text.
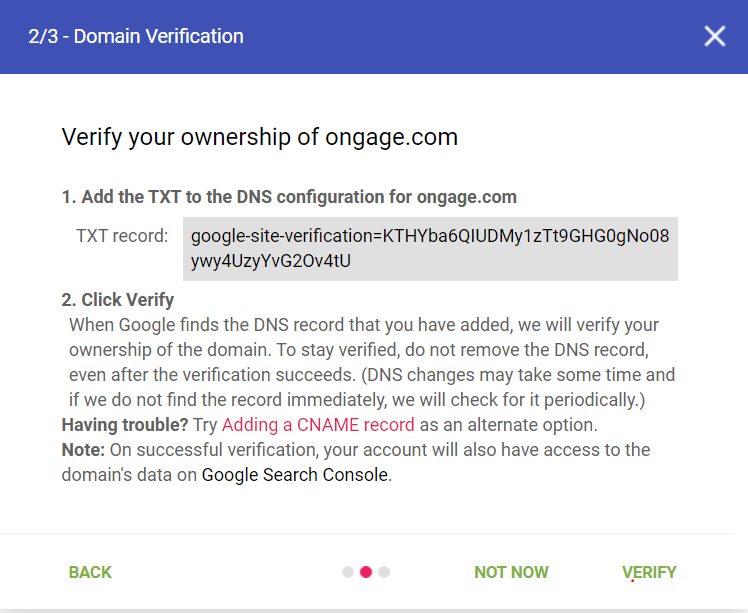
- Access your DNS record, and add the TXT data where Google prompts you to. Then click ‘verify.’
Once you have everything up and running, you can really dive in and see what happens with your messages once they’ve set out on their journey to the Gmail servers.
If you route traffic from several subdomains, these should be aggregated automatically. However, if you want granular insights, you can add them independently.

How to use Google Postmaster Tools

Don’t be alarmed if you don’t see any data when you first fire up Postmaster Tools. Google Postmaster doesn’t provide retroactive data. It will only show data from the point at which you verified your domain.
After sending a minimal amount of emails (Google doesn’t specify precisely how many, but it’s in the high hundreds), you’ll start seeing graphs and data in the following tabs:
The Spam Rate tab
Spam flags are the email world’s cobwebs, once you get flagged, the situation starts to be sticky. These spider-like ISP emiseries are notorious for intercepting adventures email marketers and trapping their emails in their nets.
And once your emails are marked as spam, they’ll be trapped in the dreaded Spam folder.
Heed your Google Postmaster’s advice. These spiders are easily defeated but only if you take the advice given in this tab.
It’s like pouring some good old elven light on the cobwebs. It will burn them away and keep your emails safely out of the Spam folder.
Google Postmaster Tools’ help with your spam rate is invaluable. A high spam rate can have drastic implications, including:
- Damage to your sender reputation and deliverability.
This starts a vicious cycle in which your bad reputation ensures that more emails end up in spam, and your sender reputation continues to decline as a consequence.
- Problems with your SMTP.
A high spam rate singles to your SMTP that you’re a bad sender. This could prevent you from using their services.
As a general rule, we recommend keeping the spam rate Google Postmaster shows you below 0.1%. If you achieve this, Google Postmaster Tools will probably round it down and offer you a spam rate of 0%.
Remember – a low spam rate doesn’t necessarily mean that your emails aren’t ending up in the spam folder. Google defines a spam rate as “…the percentage of emails marked as spam by users vs. emails sent to the inbox for active users.” If your emails land in Spam without ever hitting the inbox, you may still see a low spam rate.
Therefore, it’s crucial to keep a close eye on the bigger picture when it comes to spam rate. Google Postmaster Tools is a great aid in your spam investigation, but it won’t fight all your battles. That, you need to do on your own.
For Ongage users, the spam rate is the equivalent of the complaint rate. You can find it in the analytics or snapshot reports from your Ongage dashboard.
If you see your spam and/or complaint rate rising, it’s important to act quickly to bring it back down. Here are some ways to do this:
Make it easy for recipients to unsubscribe
Customers tend to hit the spam button because they don’t want to hear from you in the current communication form.
That’s why it’s best to give them options for either leaving or for changing what they’re getting from you. Consider the following approaches:
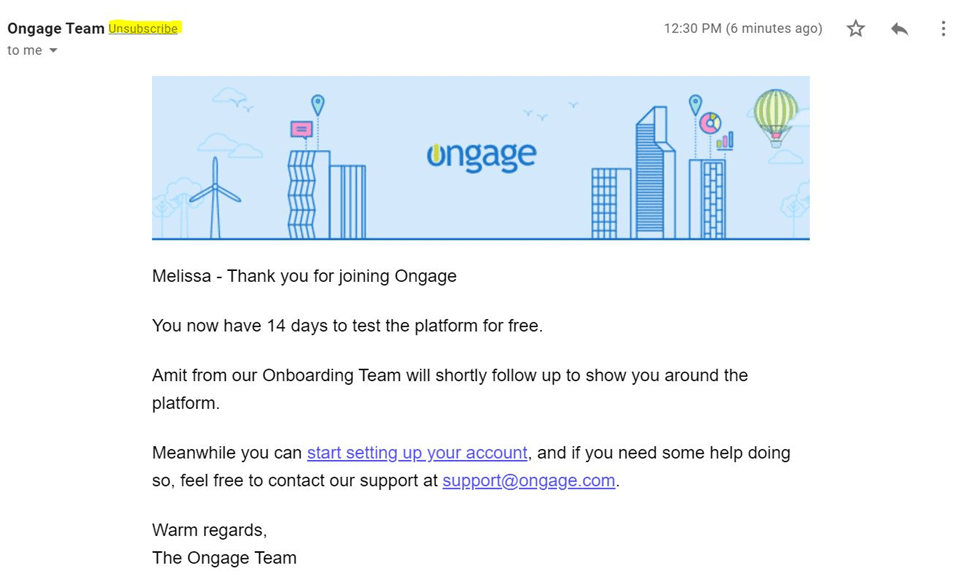
- Put clear ‘unsubscribe’ links in headers and footers. Letting people unsubscribe is a great way to clean your list and give customers control simultaneously. It’s far better for people to hit ‘unsubscribe’ than it is for them to hit ‘Mark as spam!’. As you can see in the below example, we put a prominent ‘Unsubscribe’ link right next to the sender’s name.
- You can read more about reducing unsubscribe rates in our blog post about the subject.
- Make your unsubscribe links stand out. In this example, the ‘Unsubscribe’ link in the footer is highlighted with a simple white square. It makes the link much easier to see without overwhelming the rest of the content.
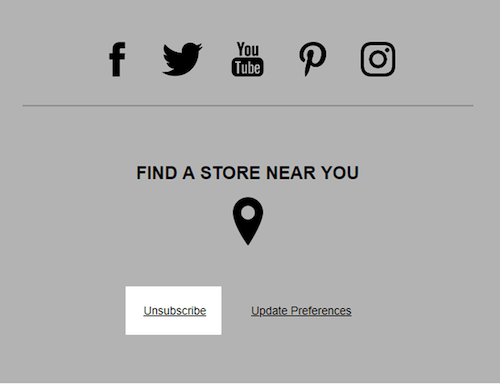
- Use preference centers. In this example from Bonobos, recipients can choose the frequency of their Bonobos messaging. This can help to reduce frustration and gives recipients a sense of control over their inboxes.

- Make sure that you have clear permission to send messages. In its ‘purest’ form, Spam is unsolicited marketing. If you’re sending messages that recipients have asked for, then by definition, you are not spamming.
In the EU, there is the GDPR legislation where opted in consent should be gathered at all times, so make it clear at the point of sign up that the new recipient can opt-in to receive the latest about your company and products.
Tactics like double opt-in and verification will further ensure that only the most engaged recipients end up on your list, making clear your ethical data policies.
The Domain and IP Reputation tabs
There are two giant statues who stand guard and separate email streams in your Google Postmaster account.
These are the ‘Domain’ and ‘IP Reputation’ tabs.
Although they are similar, Google Postmaster Tools separates these two for a couple of reasons:
- If you’re using a shared IP, your IP reputation can be influenced by others’ actions. Now you don’t want to share the same fate as the orcs and trolls of this world, do you precious?
- In addition, It makes a lot of sense if you’re using subdomains. For example, if you send transactional emails from one subdomain and promotional ones from another, it’s important to see how each one is performing.
Ultimately, Gmail will use input from both tabs to decide which path to allow your email down – but it’s nonetheless worth knowing what each one suggests.
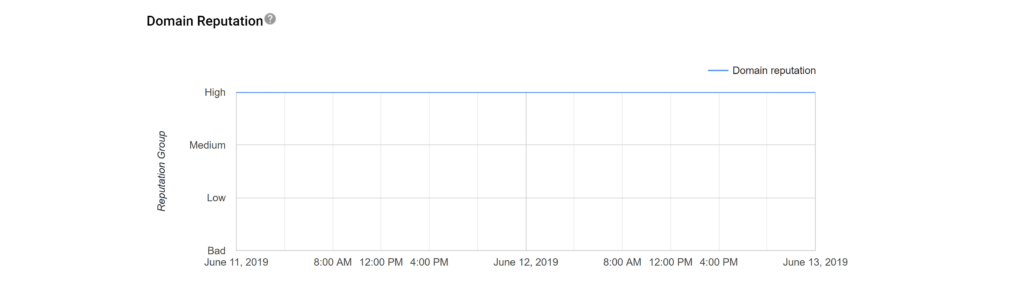
Postmaster helps you to do this by creating an easy-to-read graph detailing your reputation through four options:
- High. A high reputation means that your email has an excellent chance of hitting the inbox. As an email marketer, you are doing everything that the ISPs like and nothing that they don’t like.
- Medium. You’re usually a good mailer, but you have slipped up a couple of times. Perhaps you’ve spammed in the past. Your emails will usually get through, but you risk being blocked if your spam rate rises.
- Low. Mailers with a Low reputation are known spammers. Emails from Low senders will usually be marked as spam, and deliverability will be very poor.
- Bad. A bad sender reputation indicates that you send huge volumes of spam. Your emails will almost certainly be blacklisted.
To determine which of these four groups you belong in, Gmail uses a mix of positive and negative signals.
Negative signals include:
- Recipients are reporting your emails as spam.
- Recipients are not engaging with your email – i.e., not opening or clicking.
- Falling into spam traps or sending emails to expired and invalid addresses.
Positive signals include:
- Engaging with your emails – i.e., opening messages and clicking on links.
Landing in the inbox can be a kind of self-fulfilling prophecy. A high deliverability rate is correlated to higher engagement rates, which further boosts your deliverability rate.
However, if the two guardians find your reputation waning, there are amends to be made. You should follow the list below to get back on track quickly:
Ways to improve your domain reputation
- Read back through the above tips on reducing your spam rate. As a general rule, your reputation rises as your spam rate decreases.
- Send engaging emails using personalization and segmentation. Things to consider here include:
- Taking email personalization beyond the first name. Dive into your recipients’ likes, dislikes, interests, problems, and needs. Craft your emails to be relevant to these elements.
- Crafting relevant segments. Segmentation will help you out by enabling you to closely target personalized emails. It will also give you nuanced insights into how different customer groups respond to certain tactics.
Consider segmenting customers by things like their demographic, their location, their psychographic features, and their behavior.
- Clean and validate your list. Helping un-engaged users to unsubscribe is one thing, but it won’t weed out all the issues in your email list. It’s important to regularly use email validation services to ensure that you’re only emailing to real, engaged recipients.
- Stop sending to non-engaged users. Tips 1 and 3 will help you a lot with this, but it’s also worth setting up things like suppression lists to prevent non-engaged users from impacting your sender reputation.
Set up behavioral-based segments of users who didn’t interact with your emails in the last couple of months, and exclude them from future campaigns.
This will ensure higher engagement rates, which will boost your reputation with Gmail.
- Consider IP warming again. This should only be done if things are dire with your sender reputation, as it can slow up your marketing strategy.
However, sending in low volumes (especially to highly-engaged users) and ramping up as you go – just as you would when warming up a new IP – will help you to repair sender reputation damage done.

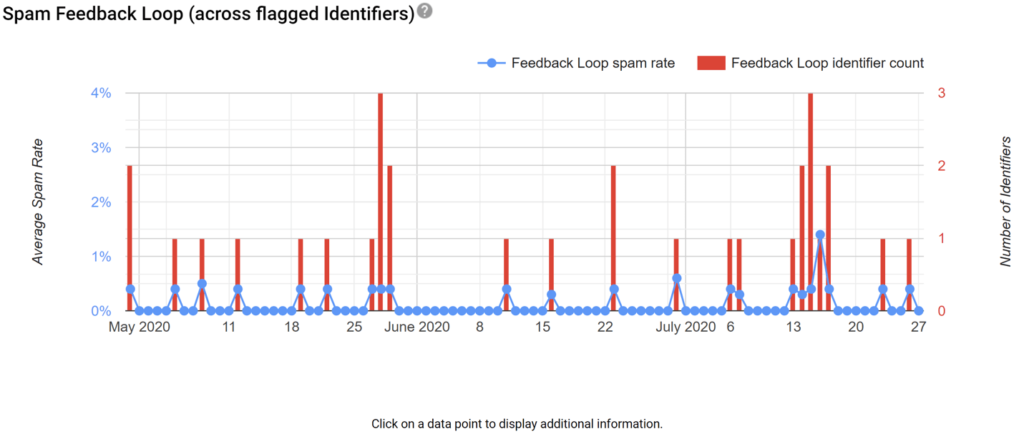
The Feedback Loop tab
The Feedback loop dashboard is especially useful for high-volume email marketers who experience the occasional (but dangerous) ambush by spam complaints.
By setting up a specialized header in your email messages, you can see the exact campaign or even a segment that reported your email message as spam. It’s like sending out a scout to warn you of enemy movements.
The template for the header looks like this:
Feedback-ID: a:b:c:SenderId
The SenderId is a mandatory unique identifier (5-15 characters) chosen by the sender.
The ‘a,b’c’ elements are optional but can help you to target the origin of spam complaints more effectively.
When implementing the header, it should look something like this:
Feedback-ID: CampaignIDX:CustomerID2:MailTypeID3:SenderId
- Campaign ID refers to the campaign.
- Customer ID refers to the segment.
- MailType ID refers to the newsletter/promotion.
These are just examples and suggestions of how you can formulate these headers. Of course, you can structure them however you see fit.
Do note that the domain from which these emails are sent needs to be DKIM verified and added to Google Postmaster, or you won’t be able to access this data. If you’re not DKIM verified, we strongly suggest that you hurry up and get verified, as it’s useful for many things (not just the feedback loop dashboard!).
Note that feedback loop data will only be displayed on the dashboard when the complaint rate is higher than 0.5%. If you see data, it means that your spam rate is higher than it should be.
The Authentication tab
Implementing authenticity protocols is a must. Without them, your chances of landing in any inbox – let alone Gmail’s – are incredibly slim.
Authentication protocols are like the keys and safe-conduct letter, which let your emails pass untroubled through dangerous territory. Your friendly Postmaster will tell you whether or not you have the right protocols and how well they’re working for you.
There are four common authentication protocols. These are:
- SPF (Sender Policy Framework). This checks the ‘From’ address of an email to verify that the sender is indeed who they say.
- DKIM (Domain Keys Identified Mail). DKIM gives a sender a tamper-proof cryptographic key. Only the authentic sender can use this key, ensuring that fake or spam mail can’t be sent from their address (and that mail can’t be tampered with en route).
- DMARC (Domain Message Authentication Reporting and Conformance). DMARC builds on SPF and DKIM by providing a feedback system that gives senders more control over unauthenticated emails. This helps to track and prevent fraudulent emails.
- BIMI (Brand Indicators for Message Information). BIMI allows you to apply your mark or logo to your emails. They’ll appear by your messages in the inbox, like this example from Thortful:

As well as making your messages stand out in the inbox, BIMI makes it clear that your messages genuinely are from you.
The Authentication dashboard will tell you everything you need to know about your emails’ authentication activity.
For example, the SPF graph shows the ratio of emails that passed SPF compared to those which attempted it. The DKIM graph acts similarly.
The DMARC graph shows the ratio of emails that passed DMARC compared to those which attempted either (or both) SPF/DKIM.
Ideally, you want every graph to show a 100% success rate. However, if you see 0% on your SPF graph (and if you’ve set everything up correctly), it might be because some ESPs manage these protocols on your behalf. The SPF record, therefore, goes through their domain rather than yours.
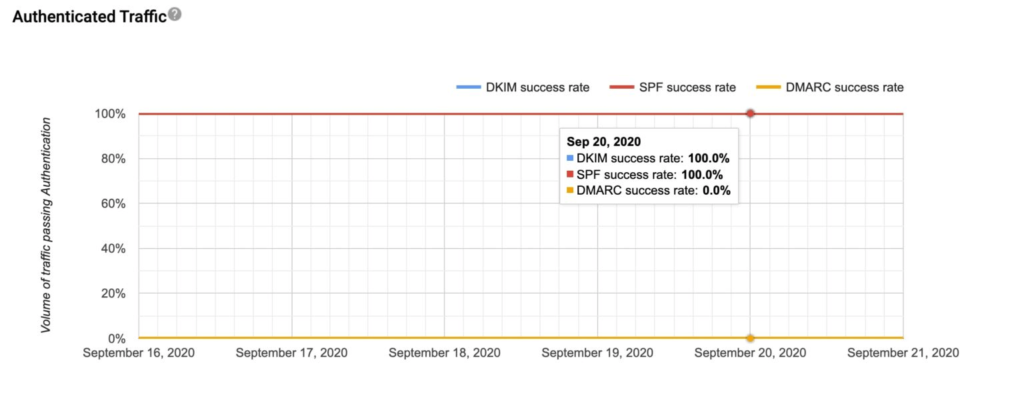
If this isn’t the case, you should consult a deliverability expert to get to the bottom of your SPF problem.
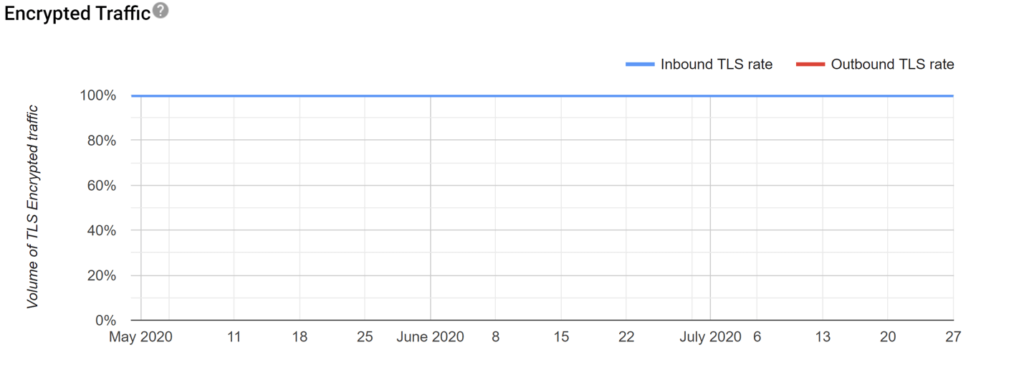
The Encryption tab
This graph will show you how many of your emails are encrypted via TLS (Transport Layer Security). TLS prevents others from eavesdropping on your email conversations.
The Encryption graph should show a consistent 100%. If it doesn’t, contact your SMTP relay to find out what’s going on. Failing to encrypt your emails is a serious problem that can reduce deliverability. You need to get it sorted ASAP.
The Delivery Errors tab

Along with the reputation tab, this is arguably the most exciting part of Google Postmaster Tools. When you experience a setback, Google Postmaster uses this feature to step in and explain where you went wrong so that you’ll have more success next time.
The Delivery Errors dashboard shows you the ratio of emails that have bounced from the Gmail server – be they soft or hard bounces.
Even better, it tells you the exact reason for each email bounce back. This means you can take precise measures to correct the error.
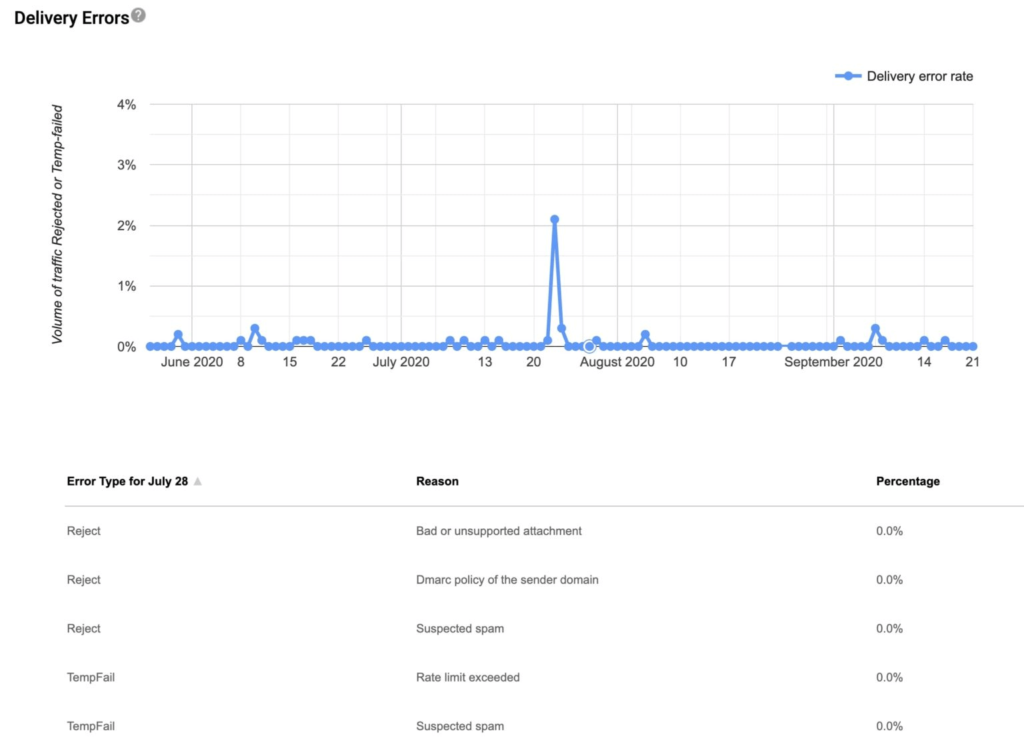
Here are some of the reasons Google Postmaster Tools may give for bounces.
You have exceeded your rate limit
Google Postmaster will tell you that your emails are bouncing because you have exceeded your rate limit when you send an unusual amount of emails in a short period. It makes ISPs suspicious.
Knowing this is why your bounces mean you can narrow down your options and attack the problem head-on. In this case, you might try two tactics:
- Throttle your campaigns over a couple of hours so that the ISPs gradually get used to your new sending rate.
- Warm-up Gmail to accept higher volumes of emails, as though you were warming up an entirely new IP.
Your content is too ‘spammy’
In this case, you need to take measures to make your content more professional and authentic-sounding. Try the following:
- Testing your content for spam keywords.
- Adding value to everything. The more authentically valuable and relevant your content is, the more likely it is to pass through the spam filters.
- Use a good sender name. Something trustworthy and not too clickbaity.
- Don’t make false promises – especially if they’re too good to be true. As a general rule, if it promises vast wealth, miracle cures, and the like, your content will be sent to Spam.
- Don’t include attachments. These can make ISPs wary of malware.
- Use ‘sophisticated’ fonts and colors. Anything that looks too tacky or unprofessional will raise red flags for the ISPs.
- Use correct spelling and grammar. This indicates that you treat this email as professional communication and have put intelligent thought into its construction.
You’ve failed DMARC
If you set your DMARC policy as ‘r,’ Gmail will bounce any emails which fail DMARC back to you. To avoid this, set your DMARC policy to ‘none.’
Your sending IP or domain has a low reputation
In this case, you must work your way back into Gmail’s good books. We’ve given lots of tips on how to do this above.
Your IP is in one of more public RBLs (Realtime Blackhole Lists)
This means that your IP has been blacklisted, and the information is out there for anyone to find. A 3rd party has marked you as a spammer, and they don’t mind the world knowing about it.
Tools like MXtools will tell you where you’ve been blacklisted. Once you’ve established the problem list, you can submit a form to that list-holder asking for your IP or domain to be removed from their list.
This may mean that you need to change your sending habits. Specifically, it would be useful to avoid spam traps through email validation and ethical data policies.

Google Postmaster for other ISPs

Google Postmaster isn’t the only trusted advisor figure out there. Microsoft has its own version, and most of what it does is similar to Google Postmaster Tools, but there are a few differences. Let’s take a look:
Microsoft SNDS
Microsoft SNDS paints a deliverability picture for emails sent to outlook.com, hotmail.com, msn.com, and live.com email addresses.
As a first step, let’s get you signed up to Microsoft SNDS:
- Head to the SNDS website and request access and request access.
- You’ll see a box saying ‘Network to request access for.’ Put in your IP address or CIDR range.
- You will then be asked to verify via a range of email addresses associated with your IP. Pick one for Microsoft to send a verification email to.
- Click the ‘View Data’ link in the left-hand corner of the screen.
- Under ‘View or change your automated access settings’ to get access to your data URLs.
Once you’re all set up, you can start reviewing your activity and gain insights into:
- The number of messages sent from your IP addresses to Microsoft recipients.
- The reputation of your sending IP addresses (marked in green, yellow, and red).
- The number of bounces you experience.
- Your bounce percentage.
- Your complaint percentage.
- The number of spam traps you trigger.
It is quite similar to what Google Postmaster Tools provides. If SNDS shows you many bounces or complaints, or if your IP reputation isn’t in the green, all the above Postmaster tips apply for SNDS.
Verizon postmaster tools
Verizon’s postmaster tools are your friend for granular insights on your performance if you’re sending to AOL and Yahoo! addresses.
Unlike Google and Microsoft, you need to send an email to Verizon’s postmaster team so they’ll sign you up for the service.
Then, you’ll be able to start seeing data on your Verizon campaigns, or as they call them, “email marketing data feeds.”
The two data feeds are:
- The Placement Feed. It reveals deliverability metrics and shows how many emails end up in the inbox and spam folders, on top of error and complaint counts.
- The Campaign Performance Feed. This one takes your email analytics to the next level. It shows you the basic opens and clicks but takes it further by including metrics on reads, glances, skims, and deletes. All broken down by each sender domain.
Even if you don’t sign up for the service, it’s still worth visiting Verizon’s website. It contains plenty of info on best practices for email marketers of all levels.
And their statement sums email marketing beautifully: “A key mission of Verizon Media is to deliver messages that consumers want to receive and filter out the messages they don’t. The best way to ensure your messages are delivered is to send timely and relevant emails to an active and engaged audience.”
Everyone else
Unfortunately, outside Google Postmaster Tools, Microsoft SNDS, and Verizon’s Postmaster, you can’t gain insights directly from other mailbox providers.
However, all is not lost!
While the reports Google, Microsoft, and Verizon provide aren’t a 1:1 representation of how other mailbox providers view you, they can certainly give you a general idea.
You can take what these services have taught you about the perilous world between your email marketing platform and Gmail/Outlook/Yahoo! and apply those lessons to the uncharted territory between you and other mailbox providers.
For example, if Gmail Postmaster tells you that you’re experiencing many bounces due to ‘spammy’ content, other ISPs are likely to have a similar issue with you. Try tightening up your content on all fronts and monitor deliverability closely to see if things improve.
You can also use 3rd party tools like Senderscore and BarracudaCentral. These will help you to estimate your IP and domain reputations.
However, even without specialized tools, you can make educated guesses about your deliverability using the metrics provided by your email marketing platform.
In your email analytics suite, filter your metrics by ISP. This should give you some insight into issues with specific ISPs. If your click rates are unusually low on a specific mailbox despite your emails providing overall good value, it’s worth trying the following tactics:
Check your bounce rate
A ‘bounce’ is essentially an email that has not been delivered. Sometimes emails bounce because it’s impossible to deliver them – perhaps, for example, the recipient address does not exist. These are known as ‘hard bounces.’
Sometimes, the reasons for non-delivery are more temporary – your sender reputation has taken a hit, for example. These are known as ‘soft bounces.’
When checking your bounce rates, be sure to look further than your last campaign. Dig deeper. Keep traveling back until you see a moment of change – for example, a high bounce rate and a drop in clicks rates.
In general, watching your bounce rates, coupled with your clicks rates, can reveal a lot about your sender reputation.
If your bounce rates are rising while your clicks rates drop, something is wrong. You have probably raised a red flag with ISPs by sending them to spam traps and/or inactive users. This lowered your sender reputation, which had an impact on your deliverability. See our deliverability tips above to combat this.
Check blacklists
Even if Postmaster did not suggest checking blacklists, we recommend doing so anyway. If you sent it to a spam trap at some point, your domain or IP could have been blacklisted.
We’ve covered how to find and deal with blacklists above. Essentially, you must find the list and request that your IP or domain is removed from it.
To avoid being blacklisted in the future, practice good email hygiene and sending habits. Never buy email lists – they are almost always full of spam traps!
Clean your email list
If you’re not on a blacklist, that’s great news! But don’t rest on your laurels yet. Even without entering a blacklist, your sender reputation can suffer due to a ‘dirty’ email list. So, be sure to maintain good list hygiene.
If you don’t regularly scrub and validate your lists, you risk causing higher than usual bounce and spam rates by emailing invalid or un-engaged emails. This may cause two major problems:
- Your engagement rates will drop, which is a very negative signal for ISPs. Your sender reputation may be damaged as a result.
- You might fall into recycled spam traps – old and inactive email addresses, which ISPs sometimes convert into spam traps. They do this to check that you’re not lazy with list hygiene, and they’ve caught out many unwary email marketers like that.
It’s easy to rid yourself of invalid emails through an email validation service. You can also exclude non-engaged users through your email platform’s behavioral segmentation tools. Exclude users who have not opened or clicked on any of your emails in the last 30/60/90 days (depending on your sending frequency).
Warm up your existing IP
Email marketers would usually be tempted to ‘fix’ a sender reputation by switching to another IP, but we do not recommend that. Remember, your IP is connected to your sender domain, and some ISPs will recognize this.
Switching to a new IP in these cases will be like slapping on a false mustache and trying to wheedle your way past someone who knows you well: it won’t work, and you’ll look silly attempting it.
It’s far better to fix the mistakes you made in the first place and come back to the ISPs as a new, improved sender.
To re-warm your IP and come back stronger than ever, use the same process you would use when warming a new IP:
- Decide on a segment of engaged users.
- Decide the volume of emails you want to send.
- Send that number for several days in a row, gradually increasing over time.
- Gradually ramp up the sending volume while including less engaged users over time.
- After a few weeks, your IP should be warm and ready to send out your new, improved campaigns (we linked to our IP Warming guide above).
Be sure to follow our tips about email validation, segmentation, engagement, and the like
to avoid tarnishing your IP’s reputation all over again. And make sure you watch your metrics like a royal eagle to check that everything is going according to plan.
Throttle your campaigns
Sometimes your email messages may be rejected (even temporarily) because you’re not throttling them enough.
Throttling is needed when ISPs are suspicious of high-volume sends or when they’re struggling to cope with a lot of traffic.
Spreading your email campaign over a couple of hours (‘throttling’ it) can help alleviate these two issues and can easily be done through your email marketing platform.
We recommend at least trying it over several campaigns while monitoring open rates since it’s easy to do and has no real costs unless your campaign is very time-sensitive.
Segment and personalize your emails for better engagement
Every email marketer knows that personalization is essential. It helps to build a connection between marketers and customers by talking to them in a manner that suits them and offering them what they want when they want it.
Segmentation aids personalization by dividing and targeting your customers according to demographics, location, interests, behavior, etc.
We went into segmentation and personalization above, but here are some examples that demonstrate more vividly how it’s done:
Amazon personalizes by purchase and browsing activity
It’s a reasonable bet that the customer will be interested in other products related to past purchases. Emailing them with information and offers on these kinds of products is not only highly personalized, but it’s also very relevant for the customer.

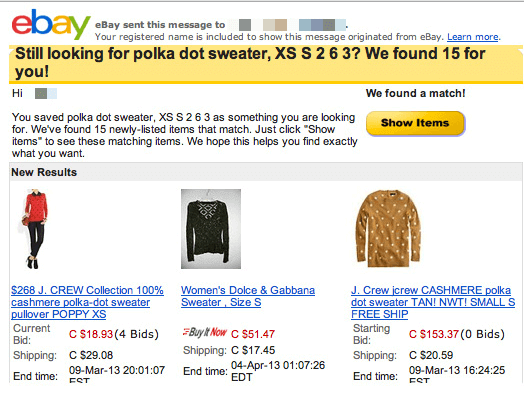
And here’s an example based on browsing activity from eBay
In the following example, Ocado emphasizes a personal relationship with the customer by acknowledging the anniversary of the customer’s subscription. To make things even more personal, they’ve done this belatedly – just like your real friends and family do! The voucher for the customer’s favorite treats is also a nice touch.

What’s the next step after Google Postmaster Tools?
Of course, Google Postmaster Tools is at its best when combined with your email marketing platform’s analytics. It knows the lay of the Gmail lands well, but only you know your audience and your email marketing operation.
A good email marketing platform will fill in the missing pieces of the analytical map, and when coupled with Google Postmaster, it will make sure that you’re sending your emails on a journey that will let them pass through the ISP’s gates!
Godspeed to you and your emails!


 Academy